First sweet on our list is this simple pie, the Buko pie! It may look simple as it does not have cream in its filing nor on top, but don't take it too simple as Buko Pie taste is one of the bests.
Buko is a Filipino word for young coconut which grows abundantly allover the Philippines. They are grown in the country as their trees can give varieties of products from roots up to it's leaves. And Buko Pie is one of it's well boasted products.
Buko Pie has gained popularity in the country particularly in the province at the south of Manila, the province of Laguna. Many street vendors sell Buko Pie even at the bus but, suggest you buy either Letty's, Collete's or Orien-The Original and other well known brands where shops stand side by side at Los Baños, Laguna as the ones sold at the street are made of fewer coconut meat and mostly made by cornstarch. A long queue of buyers of the known brands at their stores is an evidence of it's products' good taste!
The combination of the the young coconut meat's natural sweetness & texture plus the hot melts-in- your-mouth-condensed-milk-sweetened-custard gives Buko Pie truly an amazing taste one should never miss. So what are you waiting for? Come on! Let's take a bite!
Wednesday, October 10, 2012
Saturday, September 29, 2012
Flora & Fauna - Limatiks
One factor that adds flavor & spice to the Philippine Mountaineering experience is this creepy guy on the picture, the Limatik.
Limatik is a blood sucking leech that inhabits in Philippine forests, especially at dense and mossy forests thus, a common sight of the mountaineers. Inhabiting at some mountains such as Mt. Makiling, Mt. Banahaw de Lucban, Mt. Halcon, Mt. Natib, Mt. Kanlaon, Mt. Tapulao and more ( see Pinoymountaineer for the full list), the Limatiks are feared or avoided.
In detecting their victims, limatik depends on their sensory receptors that detects warm bloods, movements and Carbon dioxide exhalation. Their saliva have anesthetic substance that made their bites barely felt, and anticoagulant substance that stops blood clotting to help them easily suck blood.
Based on the Author's observation, there are two species of limatik, the dark brown or black specie and the green/yellow striped specie. Both have nature of leeches, seeking & sucking bloods from humans and animals, but different in techniques in finding their sucking spots. The black or dark brown ones are contented in the tissues around your feet and even has the ability to penetrate in a two-layered socks while, the green/yellow striped ones are the ones that targets soft tissues that are commonly present at the upper body parts of the man such as eyes, ears, nose and mouth. Because of their targets, they are the ones that usually coils up and flip/jump once they sensed their victims.
Preventing limatik bites starts with physical get up, dressing up with closed gears to avoid them to even approach skin. Wearing of light colored clothes is also advised as it helps you easily spot limatik coming your way. To avoid limatik in entering your ears, you may use ear plugs. Goggles may prevent limatik in entering your eyes, but will limit your vision thus, hiking can be compromised. Some also suggests to use fabric conditioners with insect repellent in washing your clothes to be used during your trek to a limatik infested mountain.
Using chemicals applied on your skin are also additional options to avoid limatik bites, but still, they won't give you 100% away from limatik. Off lotion maybe effective in warding off the insects and even limatik but, with the personal experiences, the Off lotion is easily washed away once you perspire which leave you unprotected shortly after you applied the lotion. Rubbing of a detergent soap is also said to be effective way to repel limatik.
Also, the use of natural stuff such as tobacco leaves and jackfruit peels are proven by some locals that resides/lives by the mountains with limatiks.
Removing limatiks already scuking your bloods needs a li'l strategy as pulling it is not advisable. It might vomit everything in it's stomach back to your wounds that may cause irritation or infection. A simple way of removing the limatik is via sliding your fingernail beneath it's mouth. You may also want to use any alcohol based solution to spray to it or apply heat to them.
Limatik is a blood sucking leech that inhabits in Philippine forests, especially at dense and mossy forests thus, a common sight of the mountaineers. Inhabiting at some mountains such as Mt. Makiling, Mt. Banahaw de Lucban, Mt. Halcon, Mt. Natib, Mt. Kanlaon, Mt. Tapulao and more ( see Pinoymountaineer for the full list), the Limatiks are feared or avoided.
In detecting their victims, limatik depends on their sensory receptors that detects warm bloods, movements and Carbon dioxide exhalation. Their saliva have anesthetic substance that made their bites barely felt, and anticoagulant substance that stops blood clotting to help them easily suck blood.
Based on the Author's observation, there are two species of limatik, the dark brown or black specie and the green/yellow striped specie. Both have nature of leeches, seeking & sucking bloods from humans and animals, but different in techniques in finding their sucking spots. The black or dark brown ones are contented in the tissues around your feet and even has the ability to penetrate in a two-layered socks while, the green/yellow striped ones are the ones that targets soft tissues that are commonly present at the upper body parts of the man such as eyes, ears, nose and mouth. Because of their targets, they are the ones that usually coils up and flip/jump once they sensed their victims.
Preventing limatik bites starts with physical get up, dressing up with closed gears to avoid them to even approach skin. Wearing of light colored clothes is also advised as it helps you easily spot limatik coming your way. To avoid limatik in entering your ears, you may use ear plugs. Goggles may prevent limatik in entering your eyes, but will limit your vision thus, hiking can be compromised. Some also suggests to use fabric conditioners with insect repellent in washing your clothes to be used during your trek to a limatik infested mountain.
Using chemicals applied on your skin are also additional options to avoid limatik bites, but still, they won't give you 100% away from limatik. Off lotion maybe effective in warding off the insects and even limatik but, with the personal experiences, the Off lotion is easily washed away once you perspire which leave you unprotected shortly after you applied the lotion. Rubbing of a detergent soap is also said to be effective way to repel limatik.
Also, the use of natural stuff such as tobacco leaves and jackfruit peels are proven by some locals that resides/lives by the mountains with limatiks.
Removing limatiks already scuking your bloods needs a li'l strategy as pulling it is not advisable. It might vomit everything in it's stomach back to your wounds that may cause irritation or infection. A simple way of removing the limatik is via sliding your fingernail beneath it's mouth. You may also want to use any alcohol based solution to spray to it or apply heat to them.
Laguna - Mt. Makiling
.jpg)
Mt. Makiling
UPLB College of Forestry, College, Los Baños, Laguna
1090 MASL
Difficulty: Minor, 4/9
Trail Class: 2-3
Trekking Time: 4-5 hours
One of the mountains in the Southern Tagalog region that boast it's richness in biodiversity is the so called Mt. Makiling. Lying at the boundaries of Laguna and Batangas, the Mt. Makiling is home for many species of plants and animals, which make her popular not just to mountaineers but also to tourists and scientists. Evidences of Makiling's richness in biodiversity are widely spread throughout the internet as they are already present the moment you start trekking. Plants with lots of thorns, mossy plants, giant trees, different sounds from different birds and insects are indeed evidences. Not to mention that there are species reported seen in Mt. Makiling such as Philippine Rafflesia and even the Author saw first hand, such as Jade Vine, Pitcher Plant, Sampinit, a large variety of Taro w/ leaves as large as a man or what we called Gabe in Filipino, a stinging plant called Lipa, and the fast crawling-blood sucking leeches called Limatik. Unfortunately, the popularity of Mt. Makiling made the mountain suffer from gradual destruction which made Mt. Makiling's inhabitants to likewise disappear.
Mt. Makiling's name came from the name of an enchanted fairy who's rumored to protect the said mountain and bless it's residences. Also, old folks and Philipine mythology are telling tales that the contour of Mt. Makiling is the fairy herself at her reclining position as from Pinoymountaineer was best appreciated along the highway of Los Baños junction going to Bay and Calauan.

Mt. Makiling is one of the hiking destination that needs lots of prepartion and planning as Mt. Makiling is one of the mountains that should never be underestimated. Although all of the mountains should never be underestimated, the Mt. Makiling has the record of numbers of registries of deaths.
Climbing Mt. Makiling has two options, one is via Sto. Tomas, Batangas, which offer harder challenges, and one is via UPLB Trail which starts at UPLB College of Forestry.
The trek via UPLB trail starts at a long rough road. Long enough to test your patience and toughness of feet soles, this road extends up to some few steps before Malaboo campsite, which passed by the Aguila Basecamp and Nursery. You will note that there are optional side trip few meters after station 1, the Flatrocks, and near the Nursery, the Mudsrpings. The end of the road might be the sign to be prepared for Mt. Makiling's mini pets, the Limatik, if you are trekking at rainy season. Not far from Malaboo campsite, is the Wilderness Zone post which tells the guests that camping is not allowed beyond the said site. No worries of getting lost anymore as trails are well established up to assault part and even up to the Peak 2 or the Summit.
TRANSPORTATION & LOGISTICS
Take bus enroute to Sta. Cruz(there are terminals of Greenstar at Buendia/LRT-Gil Puyat and HM Liner at EDSA-Cubao or there lots passing by at Alabang) and tell the operator to drop you off the UP Los Baños Junction. From there, take a jeep bound to UP College (ask the driver if his route will pass the Forestry) or you may rent if you are in a large group.
SUGGESTED ITINERARY
04:00 Assembly at Bus stop
04:30 ETD for Los Baños
06:30 ETA Los Baños, take jeep
07:00 Jumpoff, Register, Start trek
12:00 ETA Summit, Lunch
13:00 Start Descend
16:00 ETA Nursery (optional sidetrip to mudspring & flatrocks or straight home)
18:30 ETA Jumpoff, Take Dinner at the junction
19:00 ETD Home(Don't forget to buy & taste the Buko Pie!^^)
21:00 ETA Home
Tuesday, September 18, 2012
Batangas & Cavite - Bulalo
Bulalo is one of the so called "sinful foods" dish in the Philippines, not because it is forbidden but because, the dish itself is very rich in calorie. Having high in calorie content, eating Bulalo became a sin for those who are suffering with high calorie, high blood pressure, heart ailments and even those prone to related diseases. But if you are not, then you're lucky! You can enjoy the goodness of this very beef!
Bulalo has gained much popularity to the Filipinos not only in it's place of origin, Cavite & Batangas, but also to it's neighboring places including Mega Manila. This is proofed by many restaurants that serves Bulalo. Stewed along with vegetables such as Chinese Cabbage, Cabbage, Baguio Beans and even Sweet corn, this soup is best served hot thus, making the it as one the the Filipinos' favorite tummy warmer.
Bulalo is made of beef, but not just any part of the beef! Bulalo will not be Bulalo if there are no beef shanks which differentiates this dish from the another dish called Nilagang Baka or the regular Beef stew. Also, the shanks is the main responsible of making the Bulalo a sinful food as it's bone marrows is usually the favorite of the majority of the Bulalo lovers.
Since Filipinos loves condiments, the natural way they enjoy this very Bulalo, is if it is paired with dipping made by the combination of Fish sauce, Green lemon squeeze and chili sauce. So are you one of the lucky ones? What are you waiting for? Loosen up your belt and have your soup bowl ready!
Bulalo has gained much popularity to the Filipinos not only in it's place of origin, Cavite & Batangas, but also to it's neighboring places including Mega Manila. This is proofed by many restaurants that serves Bulalo. Stewed along with vegetables such as Chinese Cabbage, Cabbage, Baguio Beans and even Sweet corn, this soup is best served hot thus, making the it as one the the Filipinos' favorite tummy warmer.
Bulalo is made of beef, but not just any part of the beef! Bulalo will not be Bulalo if there are no beef shanks which differentiates this dish from the another dish called Nilagang Baka or the regular Beef stew. Also, the shanks is the main responsible of making the Bulalo a sinful food as it's bone marrows is usually the favorite of the majority of the Bulalo lovers.
Since Filipinos loves condiments, the natural way they enjoy this very Bulalo, is if it is paired with dipping made by the combination of Fish sauce, Green lemon squeeze and chili sauce. So are you one of the lucky ones? What are you waiting for? Loosen up your belt and have your soup bowl ready!
Sunday, September 16, 2012
Batangas - Mt. Batulao
Mt. BatulaoEvercrest Golf course, Nasugbu, Batangas
811 MASL
Difficulty: Minor, 3/9(New Trail) & 4/9(Old Trail)
Trail Class: 1-3 w/ 60-70 degrees assault
Trekking Time: 2-4 hours
Mt. Batulao is one of the most popular hiking destination in the CALABARZON(Cavite, Laguna, Batangas, Rizal and Quezon) region as Mt. Batulao offers a package of experience and views. This is because, Mt. Batulao has two faces, the Old trail and New trail. Although both are majorly a vast of cogonland(which create muddy trail during rainy season and a well exposed trail during summer season), the two trails still offer different levels of challenges.
Trekking Mt. Batulao will technically starts at a community, few minutes away from the entrance of the Evercrest Golfcourse. Some opt to take tricycle to drop them on the said community, rather than walking as exposure to the sun or rain begins the moment you step your feet at the entrance. But if you are cost cutting, walking is the best option to save money as tricycle may cost you around Php 30.00 if I remember right.
Moving forward, the majority of your trek passes through the ridges of the mountain until the fork of the Old and New trails. A slightly descending trail on the left after a nipa hut will lead the visitors of Mt. Batulao to the Old trail, while continuing straight forward will lead them to the New trail.
Old trail of Mt. Batulao offers a higher level of challenge as this one is steeper, 60-70 degrees assault to be exact, which you will soon after an hour of trek. From the fork, the trail is leading to a forest which gives you opportunity to pass by creeks(active during rainy season)before reaching the campsite.
From the campsite, the trails are now steep and the real challenge begin. The trail from camp 8 to 9 might look challenges for beginners but it is nothing compared to the 60-70 degrees rocky trail of camp 9 to camp 10 or the Mt. Batulao's summit.
New trail of Mt. Batulao is a relaxed trail, although you may have to pass ridges still, the steepness is nothing compared to the steepness of those in the Old trail. But don't underestimate the New trail, as you need to pass the ups and downs the slopes of Mt. Batulao.Generally, as I said before, the two trails of Mt. Batulao is a vast of cogonland and this made them open in not just sun but also winds which made them cold during night especially around December to February.
TRANSPORTATION & LOGISTICS
You may take the Crow Bus Lines that are bound to Nasugbu which will drop you straight at Evercrest Golfcourse OR you may want to take bus/van going to Tagaytay and having some sidetrips (such as Bulalo festive!:p)before taking jeep bound to Nasugbu. From Evercrest, you may opt to take tricycle or have a warm up trek.
SUGGESTED ITINERARY
Day 1
10:00 Assembly at EDSA-Taft
10:30 ETD to Nasugbu via Crow Busliner
13:00 ETA Evercrest, Take packed lunch
13:15 ETA Jumpoff/Start trek to Old trail
15:00 ETA Campsite/Start Assault
16:00 Summit
17:00 Start Descend to New trail
18:00 ETA New trail campsite/Set camp/Cook
19:00 Dinner/Socials
Day 2
06:00 Wake up call/Cook
07:00 Breakfast/Break camp
08:00 Start Descend
09:30 ETA Jumpoff/Head to Tagaytay for sidetrips
*To maximize the visit, I intentionally made an itinerary of Old-New traverse.
Monday, September 10, 2012
Batangas - Manabu Peak
Manabu Peak
Sulok, Brgy. Sta. Cruz, Sto. Tomas, Batangas
760 MASL
Difficulty: Minor, 2/9
Trail Class: 1-2
Trekking Time: 1-2 hours
Manabu Peak is a good hiking destination for those who are looking for a relaxed climb, and not to mention for beginners, as trails at Manabu does not give you much of challenges, unless of course during or after a heavy rain/storm due to muddy trails(although mud here won't be as much as the mud at Mt. Romelo or Buntot Palos Falls during rainy season). Also, taking Manabu Peak as destination is one of the usual choice of climbers who have constraints in time as trekking Manabu even at night is possible. And not to mention that in just two hours of trekking, visitors of Manabu can reach the campsite which offer much of a scenery.
Campsite of Manabu is like of a natural garden according to a known blogger, which the Author agree. It is like an open area where trees such as guavas and wild flowering plants exists. Also, one can see the peak at the campsite, as if trimmed, the grass here looks nice and extended to the campsite. A white cross is also erected on the top of the summit.
Manabu or Manabo came from the phrase "Mataas na bundok" as termed by the ancestral of the locals here. It is technically a part of Malarayat or Malasimbo mountain ranges but can be a separate hiking destination, although you may have a traverse option which may pass three major peaks of the mountain range, namely Malarayat Summit, Susong Dalaga and the very own Manabu Peak.
Trekking the trails of Manabu is technically easy as aside from low trail class
ascends here are very light(except of-course to the assault part. The first part is a long rolling then a fork which splits up to two directions. One of the trail headed to the Grotto, and the other to the hut of "Guardian of Mt. Manabu", Mang Pirying who offers you kapeng barako each time you rest at his hut(sadly, he is sick, last time the Auhtor visited Manabu, it is his brother we have found taking care of his hut and forest wide farm :p). Although both trails meet at summit, two trails are totally different path.
TRANSPORTATION & LOGISTICS
Take bus enroute to Lipa, tell the operator to drop you at Fiesta Mall before SM Lipa/Bus terminal and take tricycle to Brgy. Sulok(approx Php 150.00 - 200.00 per trip).
SUGGESTED ITINERARY
Day 1
12:00 Assembly at Bus Terminal
12:30 ETD for Lipa/Fiesta Mall
14:30 ETA Fiesta Mall/Take Tricycle
15:00 ETA Jumpoff/Register
15:30 Start Trek
17:00 ETA Campsite/Set Camp/Picture a Peak til sunset
18:00 Cook Dinner
19:00 Dinner/Socials
Day 2
06:00 Wake up call/Cook Breakfast
07:00 Breakfast
08:00 Breakcamp
08:30 Start Descend
10:00 ETA Jumpoff/take tricycle to bus terminal
10:30 ETA Bus Terminal/Board Bus to Manila
12:30 ETA Manila
*Note that itinerary was made 2 days to enjoy the coolness of the night known in Manabu, and early descend to evade the heat at campsite.
Sulok, Brgy. Sta. Cruz, Sto. Tomas, Batangas
760 MASL
Difficulty: Minor, 2/9
Trail Class: 1-2
Trekking Time: 1-2 hours
Manabu Peak is a good hiking destination for those who are looking for a relaxed climb, and not to mention for beginners, as trails at Manabu does not give you much of challenges, unless of course during or after a heavy rain/storm due to muddy trails(although mud here won't be as much as the mud at Mt. Romelo or Buntot Palos Falls during rainy season). Also, taking Manabu Peak as destination is one of the usual choice of climbers who have constraints in time as trekking Manabu even at night is possible. And not to mention that in just two hours of trekking, visitors of Manabu can reach the campsite which offer much of a scenery.
Campsite of Manabu is like of a natural garden according to a known blogger, which the Author agree. It is like an open area where trees such as guavas and wild flowering plants exists. Also, one can see the peak at the campsite, as if trimmed, the grass here looks nice and extended to the campsite. A white cross is also erected on the top of the summit.
Manabu or Manabo came from the phrase "Mataas na bundok" as termed by the ancestral of the locals here. It is technically a part of Malarayat or Malasimbo mountain ranges but can be a separate hiking destination, although you may have a traverse option which may pass three major peaks of the mountain range, namely Malarayat Summit, Susong Dalaga and the very own Manabu Peak.
Trekking the trails of Manabu is technically easy as aside from low trail class
ascends here are very light(except of-course to the assault part. The first part is a long rolling then a fork which splits up to two directions. One of the trail headed to the Grotto, and the other to the hut of "Guardian of Mt. Manabu", Mang Pirying who offers you kapeng barako each time you rest at his hut(sadly, he is sick, last time the Auhtor visited Manabu, it is his brother we have found taking care of his hut and forest wide farm :p). Although both trails meet at summit, two trails are totally different path.
TRANSPORTATION & LOGISTICS
Take bus enroute to Lipa, tell the operator to drop you at Fiesta Mall before SM Lipa/Bus terminal and take tricycle to Brgy. Sulok(approx Php 150.00 - 200.00 per trip).
SUGGESTED ITINERARY
Day 1
12:00 Assembly at Bus Terminal
12:30 ETD for Lipa/Fiesta Mall
14:30 ETA Fiesta Mall/Take Tricycle
15:00 ETA Jumpoff/Register
15:30 Start Trek
17:00 ETA Campsite/Set Camp/Picture a Peak til sunset
18:00 Cook Dinner
19:00 Dinner/Socials
Day 2
06:00 Wake up call/Cook Breakfast
07:00 Breakfast
08:00 Breakcamp
08:30 Start Descend
10:00 ETA Jumpoff/take tricycle to bus terminal
10:30 ETA Bus Terminal/Board Bus to Manila
12:30 ETA Manila
*Note that itinerary was made 2 days to enjoy the coolness of the night known in Manabu, and early descend to evade the heat at campsite.
Wednesday, September 5, 2012
Laguna - Mt. Kalisungan
Mt. KalisunganBrgy. Lamot II, Calauan, Laguna
760 MASL
Difficulty: Minor, 3/9
Trail Class: 1-2
Trekking Time : 2-4 hours
Mt. Kalisungan is one of the most promising mountain that yours truly would recommend, not just because of yours truly's residences is just 45 mins away and it is his first mountain, but also because Mt. Kalisungan offers a rewarding summit! A 360-degrees-view-summit is waiting after a trek of around 2-4 hours. Back then, the trails used in climbing Mt. Kalisungan is like a continuous assault. Yes,you read it right! The Mt. Kalisungan might have just a trail class of 1-2 but the challenges of the Mt. Kalisungan is a continuous ascend, although not that very inclined, still the what we so called "bonus round" can barely hit you feet. This is a nice preparation climb for those who are planning to climb a harder mountain as Mt. Kalisungan perfectly warms up the muscles in your limbs. Also, Mt. Kalisungan is one of the mountains that have rare sun covers thus, gears for heat protection is needed. But lately, the trail used is much easier. Starting from the jumpoff at Brgy hall of Lamot II, then walking to the school (Field of Faith) where the muddy trail begins. Then finally, the muddy trail connects to the old trails' assault, the Talahiban.
Mt. Kalisungan is a popular pilgrim destination for locals nearby and even some of the next town as back then a white cross was erected at the summit. However, the popularity of Mt. Kalisungan to fellow hikers have declined because of previous security issue. But as per latest visit of the Author, the issue is now been closed as according to a local, the named thief that causes fears is now confirmed dead due to his personal conflict, thus, nothing to fear anymore.
Mt. Kalisungan is a perfect cone thus, fearing for lost track is quite minimal. One said that if your lost and you want to keep going to the summit, you just need to keep going north, which the Author have done at first climb. But to avoid such trail blazing which is so exhausting, one must determine a good jumpoff. Getting a wrong one may lead you to a dead end as you might entered the trail of the farmers. There are lots of established jumpoff here, and personally, the Author uses the closed store few minutes away from Erais farm as he and his friends have already established acquaintance to a local farmer residing there. Many are now using the jumpoff near the Brgy. Lamot hall and locals there said that is a better now but, yours truly haven't tried that on the first hand.Also, before you reach the jumpoff, you have to drop at Masapang or the "Duck Junction" where many are selling a must try Kinulob na itik.
Trekking Mt. Kalisungan will lead you to a vast of Banana and Coconut plantation which local farmers maintain. Continuing, the last 1/3 of the trek will be a cogon grass which extends until the summit. Like what have been said earlier, the Mt. Kalisungan offers a 360 degrees view which shows the Mt. Banahaw, Mt. Cristobal, Mt. Tagapo, Talim Island, Jalajala peninsula and even the 7 lakes of San Pablo.
Mt. Kalisungan have many names and one might be confused if you are not familiar, one of the is the Mt. Lamot as named after the Barangay the encompasses the jumpoff.
TRANSPORTATION & LOGISTICS
Take bus enroute to Sta. Cruz(there are terminals of Greenstar at Buendia/LRT-Gil Puyat and HM Liner at EDSA-Cubao or there lots passing by at Alabang) and tell the operator to drop you off the Masapang or the "Duck Junction" then take tricycle to Brgy. Lamot for registration.
SUGGESTED ITINERARY
Day 1
12:00 Assembly at Bus stop
12:30 ETD to Masapang
14:30 ETA Masapang, take tricycle
15:00 ETA Jumpoff/Start trek
17:30 ETA Summit/
Cook/Dinner/Socials
Day2
06:00 Wake up call/Cook/Picture
07:00 Breakfast
08:00 Start Descent
10:00 ETA Jumpoff
>>>Optional sidetrip to Bunga Falls
*Note that the itinerary was intentionally made to evade the hottest time of the day as the exposure here may be really exhausting.
Wednesday, October 5, 2011
Climb Proper
GROUP FORMATION:
During the trek , TL or Team Leader is always in front and is responsible for pacing the group, while the Tail or Sweeper is responsible for bringing up the rear. Formation on narrow trail should be in single file and overtaking should be avoided. However, if need arises, inform the fellow climber in front in a courteous way.
Trekking together heightens the safety factor thus, it is advisable to maintain approximately 2 meters gap which will allow space for communication and proceed along the group's pace. Sometimes, compression stops are necessary to close the long gaps between companions.
PACING:
Always start with a slow pace to warm up your muscles, and gradually change your pace to group's desired pace. Maintain steady rhythm while trekking by taking longer strides on level ground and short strides while on steep slopes when communicating.
Pace of the group should be that of the slowest member or the person who has the heaviest load. This prevents the team spread along the trail in very long gaps. Do not allow anyone to lag behind, as isolated climber heightens the risk factor in an expedition. Should there be need to stop, inform the TL or the tail so that a proper order to stop can be given.
TRAIL SIGNALS:
1 LONG WHISTLE BLAST-Pause Trek
2 SHORT WHISTLE BLASTS-Resume Trek
6 WHISTLE BLASTS-HELP/Distress Signal
3 WHISTLE BLASTS-Aid is coming
TREKKING TECHNIQUES
*Ridge line is preferred in route finding. Avoid waterways and gullies as water always takes the steepest route down the mountain.
*Be sure to stay on the trail even if it is muddy or wet since walking around the mud trail will widen and become muddies in the future. You can always use a stick, walking staff or trekking pole to help you gauge the depth of the mud and even help you balance. Mud is a part of the challenge thus, expect it and face it, hike through it!
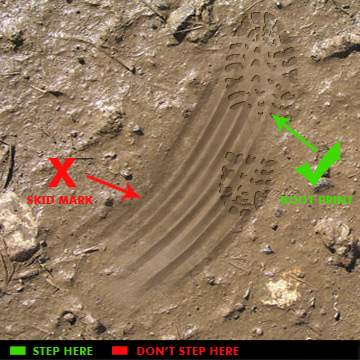
*Footprints in the mud is a big help in trekking in the muddy trail as it tells you how deep is the mud and what part is slippery. A skid mark tells you that somebody already slipped there so avoid it and try to step on someone footprints rather than exploring. If your boots got stuck on the mud, just step backward to let it free.
*Logs are generally slippery when wet so try to avoid it and walk on the grounds beside the log. If a log or fallen tree is blocking the trail, assess the safety of passing through it by either crawling or stepping on the branches, if not, make a detour.

*When there is a need to hold on roots or vines, always check if they are sturdy enough to carry you and they do not have thorns before proceeding.
DESCENDING:
Before descending, reposition heavy items at the bottom of your pack to prevent your head being pushed first to the ground and lose balance. To maintain balance and traction during descend, learn to dig first your heel or the side of your foot.If the terrain is too steep and slippery, face the wall and step downwards as if you are going down a ladder
RIVER CROSSING:
River crossing can be dangerous, in fact, a mountaineer already been reported died when he was swept away by current. Always check first for safer route, a swallower portion or even a natural bridge. If you are in any doubt in safety, NEVER attempt a crossing.
*Loosen your strap, unfasten your hipbelt and sternum strap, to allow you to remove backpack quickly incase you fall into the water since they tend to float and might trap your body under water.
*Bend your knees and face the incoming current for better balance. Cross in a diagonal line of the river so you can see any approaching debris.
*Avoid stepping directly on the top of wet and mossy rocks(usually green) as, they are very slippy. Instead, step in between the rocks for better foothold. If stuck between the rocks, pull it by stepping backward.

*It is advisable to use stick when crossing alone in knee-deep water to help you maintain your balance and can be use to check what is under water.
*Hold hands and cross in triangular formation when crossing in a group to help maintain balance and deflect currents.
*A rope strung across the body of the water diagonally downstream is advisable when the water exceeds waist level. Climbers should use the rope as a guide and should stay on the downstream side.
*When strung perpendicularly to the current, ropes tend to sag in the middle when loaded which can hinder movement. It is advisable to remove your back pack before crossing, to lessen drag since it will be easier and safer to pull it across after crossing.
TRAIL SIGNS
Currently, there are some visible laces tied on the trees on some Philippine mountains that serves a sign but here are some that can also be used:


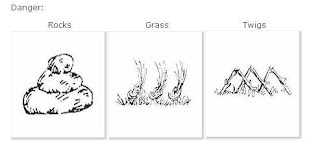
In placing a trail,it should be ideally placed in every bend so it will be visible even for night trekkers.

TRAIL ETIQUETTE:
*When trail blazing, avoid indiscriminate cutting of vegetation. Do not leave hack marks as trail sign on the trees.
*Always inform the person behind you of imminent obstacles or dangers along path.
*When a group in unsure of the proper path, team should take a break and allow some to scout the right path.
*Side trails not in used should be closed off to prevent others from using them. Block them with sticks or branches.
*Doing shortcuts can kill vegetation and can cause soil erosion. Do your part to keep our trails beautiful and less erosion.
* DO NOT LITTER. If you find litter, pick it up.
*If lost, assess your position. Remember to S.T.O.P., Stop, Think, Observe and Plan.
*In the event of accident, administer first aid, keep the victim comfortable and transfer the person to the nearest clinic/hospital.
During the trek , TL or Team Leader is always in front and is responsible for pacing the group, while the Tail or Sweeper is responsible for bringing up the rear. Formation on narrow trail should be in single file and overtaking should be avoided. However, if need arises, inform the fellow climber in front in a courteous way.
Trekking together heightens the safety factor thus, it is advisable to maintain approximately 2 meters gap which will allow space for communication and proceed along the group's pace. Sometimes, compression stops are necessary to close the long gaps between companions.
PACING:
Always start with a slow pace to warm up your muscles, and gradually change your pace to group's desired pace. Maintain steady rhythm while trekking by taking longer strides on level ground and short strides while on steep slopes when communicating.
Pace of the group should be that of the slowest member or the person who has the heaviest load. This prevents the team spread along the trail in very long gaps. Do not allow anyone to lag behind, as isolated climber heightens the risk factor in an expedition. Should there be need to stop, inform the TL or the tail so that a proper order to stop can be given.
TRAIL SIGNALS:
1 LONG WHISTLE BLAST-Pause Trek
2 SHORT WHISTLE BLASTS-Resume Trek
6 WHISTLE BLASTS-HELP/Distress Signal
3 WHISTLE BLASTS-Aid is coming
TREKKING TECHNIQUES
*Ridge line is preferred in route finding. Avoid waterways and gullies as water always takes the steepest route down the mountain.
*Be sure to stay on the trail even if it is muddy or wet since walking around the mud trail will widen and become muddies in the future. You can always use a stick, walking staff or trekking pole to help you gauge the depth of the mud and even help you balance. Mud is a part of the challenge thus, expect it and face it, hike through it!
*Footprints in the mud is a big help in trekking in the muddy trail as it tells you how deep is the mud and what part is slippery. A skid mark tells you that somebody already slipped there so avoid it and try to step on someone footprints rather than exploring. If your boots got stuck on the mud, just step backward to let it free.
*Logs are generally slippery when wet so try to avoid it and walk on the grounds beside the log. If a log or fallen tree is blocking the trail, assess the safety of passing through it by either crawling or stepping on the branches, if not, make a detour.
*When there is a need to hold on roots or vines, always check if they are sturdy enough to carry you and they do not have thorns before proceeding.
DESCENDING:
Before descending, reposition heavy items at the bottom of your pack to prevent your head being pushed first to the ground and lose balance. To maintain balance and traction during descend, learn to dig first your heel or the side of your foot.If the terrain is too steep and slippery, face the wall and step downwards as if you are going down a ladder
RIVER CROSSING:
River crossing can be dangerous, in fact, a mountaineer already been reported died when he was swept away by current. Always check first for safer route, a swallower portion or even a natural bridge. If you are in any doubt in safety, NEVER attempt a crossing.
*Loosen your strap, unfasten your hipbelt and sternum strap, to allow you to remove backpack quickly incase you fall into the water since they tend to float and might trap your body under water.
*Bend your knees and face the incoming current for better balance. Cross in a diagonal line of the river so you can see any approaching debris.
*Avoid stepping directly on the top of wet and mossy rocks(usually green) as, they are very slippy. Instead, step in between the rocks for better foothold. If stuck between the rocks, pull it by stepping backward.

*It is advisable to use stick when crossing alone in knee-deep water to help you maintain your balance and can be use to check what is under water.
*Hold hands and cross in triangular formation when crossing in a group to help maintain balance and deflect currents.
*A rope strung across the body of the water diagonally downstream is advisable when the water exceeds waist level. Climbers should use the rope as a guide and should stay on the downstream side.
*When strung perpendicularly to the current, ropes tend to sag in the middle when loaded which can hinder movement. It is advisable to remove your back pack before crossing, to lessen drag since it will be easier and safer to pull it across after crossing.
TRAIL SIGNS
Currently, there are some visible laces tied on the trees on some Philippine mountains that serves a sign but here are some that can also be used:
In placing a trail,it should be ideally placed in every bend so it will be visible even for night trekkers.

TRAIL ETIQUETTE:
*When trail blazing, avoid indiscriminate cutting of vegetation. Do not leave hack marks as trail sign on the trees.
*Always inform the person behind you of imminent obstacles or dangers along path.
*When a group in unsure of the proper path, team should take a break and allow some to scout the right path.
*Side trails not in used should be closed off to prevent others from using them. Block them with sticks or branches.
*Doing shortcuts can kill vegetation and can cause soil erosion. Do your part to keep our trails beautiful and less erosion.
* DO NOT LITTER. If you find litter, pick it up.
*If lost, assess your position. Remember to S.T.O.P., Stop, Think, Observe and Plan.
*In the event of accident, administer first aid, keep the victim comfortable and transfer the person to the nearest clinic/hospital.
Packing of Equipments
There are three things to consider in packing your equipment:
MAXIMUM CARRYING LOAD should not exceed one-third(1/3) of your body weight, this is not to limit your perfomance during the climb.
ACCESSIBILITY, BALANCE & COMPRESSIBILTY(ABC): The goal is to have balanced pack so the light items should be packed at the bottom and away from the frame while heavy items should be placed closed to the back. Essentials(i.e. rain gear, first aid, swiss knife, trail food & water should be in the top compartment.

WATER PROOFING: All equipment which may damaged by wter should be sealed in durable plastic bags. Use a large plastic as the inner lining for the backpack to provide additional protection. Watch out for those pointed gear while packing. Use Ziplocks for electronic gadgets.
1.
2.
3.
MAXIMUM CARRYING LOAD should not exceed one-third(1/3) of your body weight, this is not to limit your perfomance during the climb.
ACCESSIBILITY, BALANCE & COMPRESSIBILTY(ABC): The goal is to have balanced pack so the light items should be packed at the bottom and away from the frame while heavy items should be placed closed to the back. Essentials(i.e. rain gear, first aid, swiss knife, trail food & water should be in the top compartment.

WATER PROOFING: All equipment which may damaged by wter should be sealed in durable plastic bags. Use a large plastic as the inner lining for the backpack to provide additional protection. Watch out for those pointed gear while packing. Use Ziplocks for electronic gadgets.
1.

2.

3.
Leave No Trace Principle(LNT)
This principle provides framework for outdoor decision making to reduce the impact of their activity to our beloved nature. It also introduces the importance of taking personal role in preserving the outdoor experience for future generations. This is summarized into 7 principles.1. PLAN AHEAD AND PREPARE. We all know that poorly planned actions often resorts to excessive consumption or too much expenses of any resources, this is same as poorly planned climb or outdoor activity. A poorly planned climb can often resort to e-camp which causes improper located camp site due to unprepared time budgetting of how to reach the destination. Same is true with poorly planned meals which resorts to excessive trash or even improper campfires.
2. TRAVEL AND CAMP ON DURABLE SURFACES. Damage to land occurs when surface vegetation or communities of organisms are trampled beyond repair. This often results soil erosion and unsable trails & campsites.
*In high use areas, LNT suggest that people concentrate activity, which makes further damage unlikely. Use same trail and don't create a new one.
*In areas of very little or no use, LNT encourages people to spread out. Taking different paths when hiking off-tail will avoid creating new trails. Dispersing tents and equipment & moving camp daily will avoid creating permanent-looking campsites.
3. DISPOSE OF WASTE PROPERLY. Though most trash and litter in the backcountry is not significant in terms of the long term ecological health of an area, it does rank high as a problem in the minds of many backcountry visitors. Trash and litter are primary social impacts which can greatly detract from the naturalness of an area. Thus, LNT recommends that trash and litter should be packed out. Further, backcountry users create body waste and waste water which requires proper disposal according to LNT.
*Waste water: Avoiding soap and dispersing dishwater far away from natural resources will prevent contamination.
*Human waste: Proper human waste disposal prevents spread of disease, exposure to others, and speed decomposition. Catholes, 6-8 inches deep and 200 feet away from water, are often the easiest and most practical way to dispose feces.
4. LEAVE WHAT YOU FIND. Leaving rocks, plants, archaeological artifacts and other objects as found will allow others sense of discovery. Similarly, LNT directs people to minimize alterations, such as digging tent trenches, hammering nail into trees, permanently clearing an area of rocks or twigs. Do not vandalize mountain structure, not put your name or write any graffiti in trees or any structures along the trail.
5. MINIMIZE USE AND IMPACT OF FIRE. LNT encourages people to use lightweight camp stoves instead of fires, beacuase the naturalness of many areas has been degraded by overuse of fires and increasing demand for firewood. If a campfire is constructed, LNT suggests using an existing fir ring in a well-placed campsite or to use a fire pan or mound fire. True LNT fires show no evidence of having ever constructed. In the Philippines in general, campfires are never recommended.
6. RESPECT WILDLIFE. If enough people approach or interfere with wildlife, it can be disruptive to animals populations. Feeding wildlife is not advisable as it damages health, alters natural behaviors, and exposes them to predators and other dangers.
7. BE CONSIDERATE OF OTHER VISITORS Following hiking etiquettes and maintaining quiet allows visitors to go through the wilderness with the minimal impact on the other users. In the Philippine, courtesy such as "Good Morning sir/ma'am, Take care sir/ma'am" are practiced. Also, LNT quotes "LET NATURE'S SOUND PREVAIL".
Other than this principle, mountaineers follow a CREED which quite relative with the LNT:
Subscribe to:
Posts (Atom)


.jpg)